Getting started with Prism for Xamarin.Forms
Content
- Overview
- Prerequisites
- Background
- Xamarin.Forms
- MVVM
- Creating a new solution
- Installing and using the Prism Template Pack
- Running the app
- Views overview
- View Models overview
- Adding a new Page (View) and ViewModel
- Navigating to your new Page
Overview
This guide will walk you through creating a new Xamarin.Forms project that uses Prism, running the application, and modifying it to demonstrate basic use of Prism for Xamarin.Forms.
Prerequisites
This guide assumes that you have Xamarin, Xamarin Android Player, and Visual Studio 2015 already installed along with a basic understanding of those technologies. If you do not, please take a look at the excellent resources available at xamarin.com and visualstudio.com.
Background
What's Xamarin.Forms?
Build native UIs for iOS, Android and Windows from a single, shared C# codebase.
Xamarin.Forms allows you to build applications for iOS, Android and Windows that share both back and front end code. For more information take a look at Xamarin.Forms.
What's MVVM?
MVVM stands for Model View ViewModel and it is a design pattern that allows for clean separation of concerns between the user interface and the model behind it. A major advantage of MVVM is that it leverages data-binding to display information and respond to user input.
The following diagram shows the interaction between the components in MVVM.

For more information reference The MVVM Pattern by Microsoft Patterns & Practices
Creating a new solution
Installing and using the Prism Template Pack
The easiest way to get a new solution up and running is with the Prism Template Pack. Let's start by installing it in Visual Studio.
Go to Tools > Extensions and Updates select Online and search for Prism Template Pack. Locate the the extensions, click Download, and complete the installation. Click the Restart Now button.
Now that we have the Template Pack installed, lets create a new solution. Go to File > New > Project... select Installed > Templates > Visual C# > Prism. Here you will find all the templates available for a new Prism project/solution.
Select Prism Unity App (Forms) Visual C# fill in the name of your project/solution and click OK
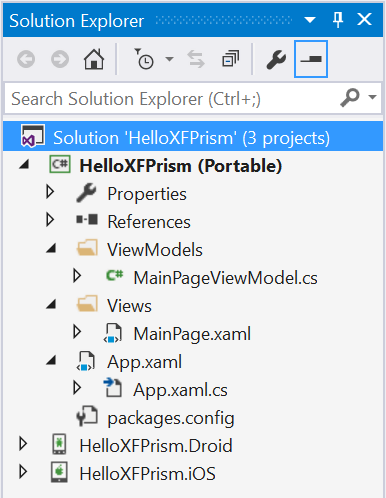
A new solution was created with a Portable Class Library (PCL) project labeled (Portable) and device-dependent projects (Android, iOS, Windows Phone). NuGet packages were added to these projects for Xamarin.Forms, Prism, and Prism.Unity along with all their dependencies.
Running the app
Android
Right click on the Android project and select set as startup project. Also ensure build and deploy are both checked for the Android project in the Configuration Manager.
Open the Xamarin Android Player and ensure that a device image is installed and note the API level of the device image.
Open the Android project properties and change the Minimum Android to target to be equal or less than the API level of the device image you will be running on.
Select the Android Player device from the Debug drop down menu and click the debug play button (or press F5).
iOS
This is for Visual Studio (on Windows):
First make sure that there's a connection with the Xamarin Mac Agent.
Right click on the iOS project and select set as startup project. Also ensure build and deploy are both checked for the iOS project in the Configuration Manager.
For running the application on a physical iOS device, there must be an connected the iOS device to the PC. The build configuration needs to be set on "iPhone" (even for testing with an iPad). If there is only one iOS device attached to the PC it'll select the one. When there're multiple iOS devices attached, you must select with device you want to run on.
For running the application on a iOS simulator needs the build configuration be set to "iPhoneSimulator" (even for testing with an iPad simulator).
After chosen the build configuration, the app can be run by click the debug play button (or press F5).
Windows Phone
To be added.
Views
Within the Portable project there is a View folder. This folder will contain all of your view related code. The template created a Content Page called MainPage.xaml in this folder. Lets take a look at this file.
<?xml version="1.0" encoding="utf-8" ?>
<ContentPage xmlns="http://xamarin.com/schemas/2014/forms"
             xmlns:x="http://schemas.microsoft.com/winfx/2009/xaml"
             xmlns:prism="clr-namespace:Prism.Mvvm;assembly=Prism.Forms"
             prism:ViewModelLocator.AutowireViewModel="True"
             x:Class="GettingStartedWithPrismForXamarinForms.Views.MainPage"
             Title="MainPage">
  <StackLayout HorizontalOptions="Center" VerticalOptions="Center">
    <Label Text="{Binding Title}" />
  </StackLayout>
</ContentPage>
There are some important things happening here, let's break down whats going on.
xmlns:prism="clr-namespace:Prism.Mvvm;assembly=Prism.Forms"
The Prism library is referenced.
prism:ViewModelLocator.AutowireViewModel="True"
This view (MainPage.xaml) is wired to the view model (MainPageViewModel.cs) automatically via naming conventions allowing for databinding to the view model. See ViewModelLocator documentation for more information.
<Label Text="{Binding Title}" />
A label is created on the page with the text bound to the property named Title in the view model (MainPageViewModel.cs).
View Models
Within the Portable project there is a ViewModels folder. This folder will contain all of your view model related code. The template created a view model for the MainPage called MainPageViewModel.cs in this folder. Lets take a look at this class and break down what is going on here.
public class MainPageViewModel : BindableBase, INavigationAware
{
    private string _title;
    public string Title
    {
        get { return _title; }
        set { SetProperty(ref _title, value); }
    }

    public void OnNavigatedFrom(NavigationParameters parameters){}

    public void OnNavigatedTo(NavigationParameters parameters)
    {
        if (parameters.ContainsKey("title"))
            Title = (string)parameters["title"] + " and Prism";
    }
}
public class MainPageViewModel : BindableBase, INavigationAware
The MainPageViewModel inherits from BindableBase and implements the INavigationAware interface.
The BindableBase class implements the INotifyPropertyChanged interface which allows for the view to be able to databind to properties created here. BindableBase also provides a protected SetProperty method to simplify creating these properties.
The INavigationAware interface allows for the view model to be notified when it is being navigated from or being navigated to. See the INavigationAware documentation for more information.
private string _title;
public string Title
{
    get { return _title; }
    set { SetProperty(ref _title, value); }
}
Creates a public property named Title that triggers the OnPropertyChanged event when the value is set.
public void OnNavigatedFrom(NavigationParameters parameters){}

...

public void OnNavigatedTo(NavigationParameters parameters)
{
...
These methods are called with the view model is navigated from or to. Here it expects a string via the NavigationParameters parameter and modifies the Title property with the string's value. See the INavigationAware documentation for more information.
Adding a new Page (View) and ViewModel
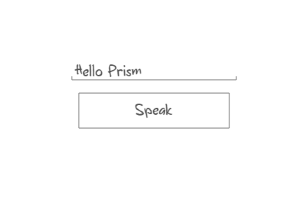
Now that we have a basic understanding of how project is setup with Prism for Xamarin.Forms, let's add to it and create a new Page (View) and ViewModel. We'll create a page with a text entry field and a button similar to the wireframe below. Later we'll add functionality to make the phone speak the text that's entered into the text field.
View
Let's create the new content page in the project, also known as the view. Again, the easiest way to do this is with the Prism Template Pack. We'll create the view first. Right click on the Views folder, click Add > New Item... under Installed > Visual C# > Prism > Forms select Prism ContentPage (Forms). Name the page SpeakPage.xaml and click Add. This creates a blank content page.
There are many different types of pages available in Xamarin Forms, but the ContentPage is one of the most basic. It displays a single visual object, typically a layout. UpdateSpeakPage.xaml to have the contents shown below.
<?xml version="1.0" encoding="utf-8" ?>
<ContentPage xmlns="http://xamarin.com/schemas/2014/forms"
             xmlns:x="http://schemas.microsoft.com/winfx/2009/"
             xmlns:prism="clr-namespace:Prism.Mvvm;assembly=Prism.Forms"
             prism:ViewModelLocator.AutowireViewModel="True"
             x:Class="HelloXFPrism.Views.SpeakPage">
  <StackLayout VerticalOptions="CenterAndExpand">
    <Entry Text="{Binding TextToSay}" />
    <Button Text="Speak" Command="{Binding SpeakCommand}"/>
  </StackLayout>
</ContentPage>
Let's break down what is going on here.
xmlns:prism="clr-namespace:Prism.Mvvm;assembly=Prism.Forms"
The Prism library is referenced.
prism:ViewModelLocator.AutowireViewModel="True"
This view (SpeakPage.xaml) is wired to the view model (SpeakPageViewModel.cs) automatically via naming conventions allowing for databinding to the view model. See ViewModelLocator documentation for more information.
<StackLayout VerticalOptions="CenterAndExpand">
...
</StackLayout>
This sets the ContentPage's view to a StackLayout. A StackLayout positions it's child elements each on a single line, stacking them either horizontally or vertically. This is a very common layout used within Xamarin Forms. We're using it along with it's VerticalOptions set to CenterAndExpand so the child elements show up as stacked vertically and centered as shown in the wireframe above.
<Entry Text="{Binding TextToSay}" />
An Entry is provided that allows the user to enter text. The text that is entered is data-bound to a property named TextToSay in the SpeakPageViewModel, which we'll create soon.
<Button Text="Speak" Command="{Binding SpeakCommand}"/>
A Button is placed below the Entry. The button's command is executed when it is clicked and is bound to a command named SpeakCommand in the SpeakPageViewModel, which we'll create soon.
View Model
Now that we have a view named SpeakPage, we'll add it's corresponding view model. As with all the other steps, the easiest way to create a view model is with the Prism Template Pack. Right click on the ViewModels folder, click Add > New Item... under Installed > Visual C# > Prism > Forms select Prism ViewModel. Name the page SpeakPageViewModel.cs and click Add. This creates a view model for the SpeakPage. Update SpeakPageViewModel.cs to have the following contents within the namespace.
namespace HelloXFPrism.ViewModels
{
    using Prism.Commands;
    using Prism.Mvvm;

    public class SpeakPageViewModel : BindableBase
    {
        private string _textToSay = "Hello Prism";
        public string TextToSay
        {
            get { return _textToSay; }
            set { SetProperty(ref _textToSay, value); }
        }

        public DelegateCommand SpeakCommand { get; set; }

        public SpeakPageViewModel()
        {
            SpeakCommand = new DelegateCommand(Speak);
        }

        private void Speak()
        {
            //TODO: call service
        }
    }
}
Let's break down what is going on here.
private string _textToSay = "Hello Prism";
public string TextToSay
{
    get { return _textToSay; }
    set { SetProperty(ref _textToSay, value); }
}
Creates a string property that the text entry field is bound to. The initial text is "Hello Prism". SetProperty is provided by Prism to simplify creating bindable properties. See the ViewModels section of this document for more information.
public DelegateCommand SpeakCommand { get; set; }

public SpeakPageViewModel()
{
    SpeakCommand = new DelegateCommand(Speak);
}
Creates a DelegateCommand called SpeakCommand that the Speak button is bound to. The SpeakCommand is created in the SpeakPageViewModel constructor and will invoke the Speak method, which hasn't been written yet. To be able to perform the actual text-to-speech platform specific APIs need to be used. This is outside the scope of this documentation, but head over to the Dependency Service documentation to see how this is done.
Navigating to your new page
We now have two pages in our app, a main page and a speak page. To navigate to the new page, we'll need to register the page for navigation. In the Portable Class Library, HelloXFPrism (Portable), open App.xaml.cs (you may have to click the carrot next to App.xaml to see it). Register the new page for navigation by updating RegisterTypes() to include the following.
Container.RegisterTypeForNavigation<SpeakPage>();
You can now navigate to the new page so let's setup MainPage to navigate. In MainPage.xaml add a button below the existing label.
<Button Text="Navigate to speak page" Command="{Binding NavigateToSpeakPageCommand}" />
Now we need to update MainPage's view model to include the NavigateToSpeakPageCommand and perform navigation. Update MainPageViewModel.cs to include the following.
private INavigationService _navigationService;

public DelegateCommand NavigateToSpeakPageCommand { get; private set; }

public MainPageViewModel(INavigationService navigationService)
{
    _navigationService = navigationService;
    NavigateToSpeakPageCommand = new DelegateCommand(NavigateToSpeakPage);
}

private void NavigateToSpeakPage()
{
    _navigationService.Navigate("SpeakPage");
}
Let's break down what's going on here.
public MainPageViewModel(INavigationService navigationService)
{
    _navigationService = navigationService;
    NavigateToSpeakPageCommand = new DelegateCommand(NavigateToSpeakPage);
}
Using dependency injection, gets the navigation service and also creates the NavigateToSpeakPageCommand.
private void NavigateToSpeakPage()
{
    _navigationService.NavigateAsync("SpeakPage");
}
Tells the navigation service to navigate to the SpeakPage.
With navigation all wired up and the "Navigate to speak page" button is pressed in the view the NavigateToSpeakPageCommand will be called on the view model, the command will execute the NavigateToSpeakPage method, and finally the Navigation Service will perform the navigation to the SpeakPage.
For more information on the navigation service see the navigation service documentation